
I have finished similar tasks more than three times, so I though I would better write down it so in the future I could have a reference and just need to follow it step by step.
Below steps only tested on DSM 5.X (5.2 for me), and I will not upgrade it to DSM 6.X, so for 6.X system maybe I will write one blog for it.
My NAS environment:
HP Microserver Gen8 + P212 Smart Array + Highpoint X4 external enclosure, so at most I could add 8 disks to the raid array and this time I added the seventh one.
ESXi 6.0 is running on the Gen8 and Synology NAS is one of the VMs.
A new hard disk will arrive next month and I will convert it to RAID6.
Before the task, we should know it contains below several steps:
- Add the disk to the raid array
- Expand/extend the logical drive in the array
- Extend the datastore and the VMDK file in the ESXi
- Extend the volume of the Synology NAS
Another way is to add another basic volume to the Synology NAS while I prefer to place all my files on one file system as I do not want to copy or move files in the future.
The first step is really time consuming -- in fact this time it lasted for about 4-5 days!
Below are the detail commands for every step:
- Add the disk to the raid array
[root@esxi:/opt/hp/hpssacli/bin] ./hpssacli controller all show config

Smart Array P212 in Slot 1                (sn: PACCP9SZ2DQB  )


   Port Name: 1I

   Port Name: 2E
   array A (SATA, Unused Space: 0  MB)


      logicaldrive 1 (13.6 TB, RAID 5, OK)

      physicaldrive 1I:0:1 (port 1I:box 0:bay 1, SATA, 3 TB, OK)
      physicaldrive 1I:0:2 (port 1I:box 0:bay 2, SATA, 3 TB, OK)
      physicaldrive 1I:0:3 (port 1I:box 0:bay 3, SATA, 3 TB, OK)
      physicaldrive 1I:0:4 (port 1I:box 0:bay 4, SATA, 3 TB, OK)
      physicaldrive 2E:0:5 (port 2E:box 0:bay 5, SATA, 3 TB, OK)
      physicaldrive 2E:0:6 (port 2E:box 0:bay 6, SATA, 3 TB, OK)

   unassigned

      physicaldrive 2E:0:7 (port 2E:box 0:bay 7, SATA, 3 TB, OK)

   SEP (Vendor ID PMCSIERA, Model  SRC 8x6G) 250  (WWID: 500143800976949F)
[root@esxi:/opt/hp/hpssacli/bin] ./hpssacli controller slot=1 array A add drives=2E:0:7
[root@esxi:/opt/hp/hpssacli/bin] ./hpssacli controller slot=1 modify expandpriority=high
[root@esxi:/opt/hp/hpssacli/bin] date; ./hpssacli controller all show config detail|grep Transforming
Sat Dec 23 11:39:39 UTC 2017
         Status: Transforming, 0.58% complete
This step will last several days depending on your array size, and after that a Parity Initialization would start automatically:
[root@esxi:~] /opt/hp/hpssacli/bin/hpssacli controller all show config detail|grep Progress
         Parity Initialization Status: In Progress
         Parity Initialization Progress: 0% complete
After several hours we could extend the logical drive.
- Expand/extend the logical drive in the array
[root@esxi:~] /opt/hp/hpssacli/bin/hpssacli controller slot=1 logicaldrive 1 modify size=max forced
[root@esxi:~] /opt/hp/hpssacli/bin/hpssacli controller all show config detail|grep Progress
         Parity Initialization Status: In Progress
         Parity Initialization Progress: 5% complete
When finished, the size of the logical drive would have been increased.
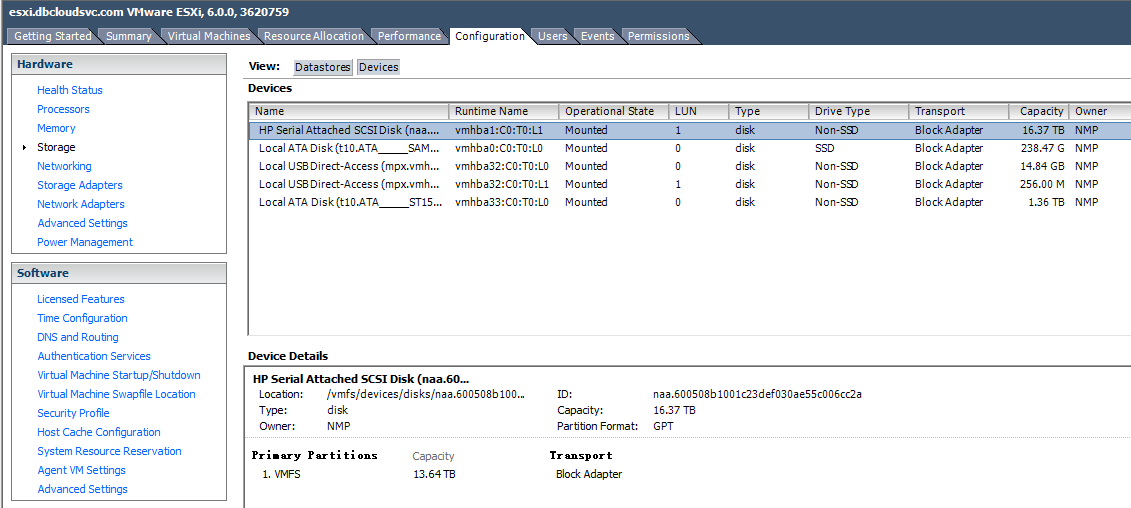
[root@esxi:~] /opt/hp/hpssacli/bin/hpssacli controller all show config Smart Array P212 in Slot 1 (sn: PACCP9SZ2DQB ) Port Name: 1I Port Name: 2E array A (SATA, Unused Space: 0 MB) logicaldrive 1 (16.4 TB, RAID 5, OK) physicaldrive 1I:0:1 (port 1I:box 0:bay 1, SATA, 3 TB, OK) physicaldrive 1I:0:2 (port 1I:box 0:bay 2, SATA, 3 TB, OK) physicaldrive 1I:0:3 (port 1I:box 0:bay 3, SATA, 3 TB, OK) physicaldrive 1I:0:4 (port 1I:box 0:bay 4, SATA, 3 TB, OK) physicaldrive 2E:0:5 (port 2E:box 0:bay 5, SATA, 3 TB, OK) physicaldrive 2E:0:6 (port 2E:box 0:bay 6, SATA, 3 TB, OK) physicaldrive 2E:0:7 (port 2E:box 0:bay 7, SATA, 3 TB, OK) SEP (Vendor ID PMCSIERA, Model SRC 8x6G) 250 (WWID: 500143800976949F) - Extend the datastore and the VMDK file in the ESXi
Checked and confirmed the new size had been recognized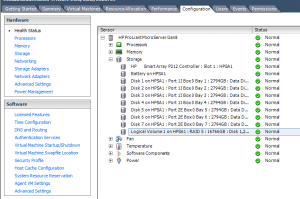

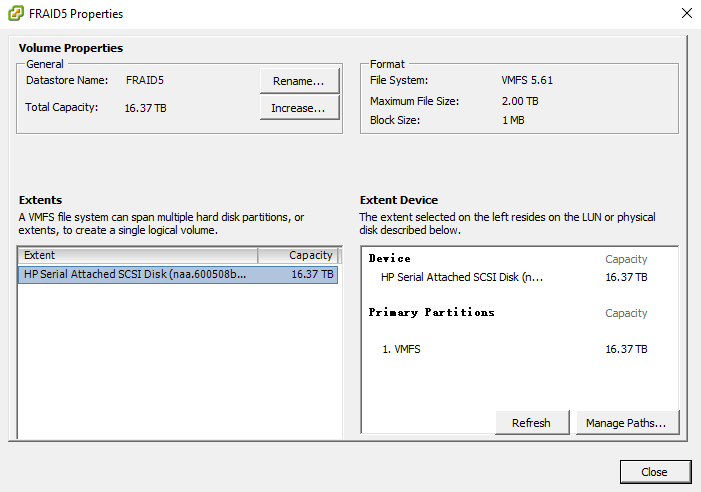
 From the 'Properties' of the Datastore, we could increase the size easily.
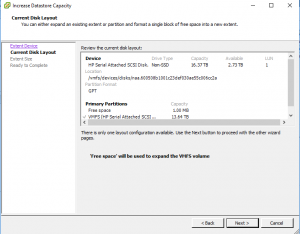 Selected 'Maximum available space'
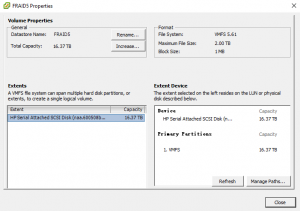 And we could increase the size of the VMDK file directly through the client.
- Extend the volume of the Synology NAS
To finish this step safely, I created another VM and managed this soft raid array, then detached it and opened it in the NAS system.[root@esxi:~] vim-cmd vmsvc/getallvms Vmid Name File Guest OS Version Annotation 10 ora12c [FRAID5] ora12c/ora12c.vmx rhel7_64Guest vmx-11 11 dsm [FRAID5] dsm/dsm.vmx other26xLinux64Guest vmx-11 12 rac-node2 [FRAID5] rac12-node2/rac12-node2.vmx rhel6_64Guest vmx-11 13 oracc12c [SSD] oracc12c/oracc12c.vmx rhel6_64Guest vmx-11 15 rac12-leaf1 [FRAID5] rac12-leaf1/rac12-leaf1.vmx rhel6_64Guest vmx-11 16 rac12-leaf2 [FRAID5] rac12-leaf2/rac12-leaf2.vmx rhel6_64Guest vmx-11 18 ddns [FRAID5] ddns/ddns.vmx rhel6_64Guest vmx-11 20 RController [SSD] RController/RController.vmx winNetEnterpriseGuest vmx-11 9 rac-node1 [FRAID5] rac12-node1/rac12-node1.vmx rhel6_64Guest vmx-11
Got the Vmid of all the VMs as I could not attach so large disk to the VM directly, and added it to the VM named ora12c:
[root@esxi:~] vim-cmd vmsvc/device.diskaddexisting 10 /vmfs/volumes/FRAID5/dsm/dsm.vmdk 0 5
I already had five disks (0-4) on the SCSI channel 0, so assigned the number 5 of the vmdk file. Please make sure the NAS system is stopped before following commands.
[root@ora12c ~]# fdisk -l
....................
WARNING: fdisk GPT support is currently new, and therefore in an experimental phase. Use at your own discretion.

Disk /dev/sdf: 17592.2 GB, 17592186044416 bytes, 34359738368 sectors
Units = sectors of 1 * 512 = 512 bytes
Sector size (logical/physical): 512 bytes / 512 bytes
I/O size (minimum/optimal): 512 bytes / 512 bytes
Disk label type: gpt


#         Start          End    Size  Type            Name
 1         2048      4982527    2.4G  Linux RAID
 2      4982528      9176831      2G  Linux RAID
 3      9437184  30408703966   14.2T  Linux RAID      Linux RAID
......................
Disk /dev/md127: 15564.4 GB, 15564423544320 bytes, 30399264735 sectors
Units = sectors of 1 * 512 = 512 bytes
Sector size (logical/physical): 512 bytes / 512 bytes
I/O size (minimum/optimal): 512 bytes / 512 bytes
......................
[root@ora12c ~]# gdisk -l /dev/sdf
GPT fdisk (gdisk) version 0.8.6

Partition table scan:
  MBR: protective
  BSD: not present
  APM: not present
  GPT: present

Found valid GPT with protective MBR; using GPT.
Disk /dev/sdf: 34359738368 sectors, 16.0 TiB
Logical sector size: 512 bytes
Disk identifier (GUID): 3FA697A2-5A88-45AD-89B3-70C227AF71AE
Partition table holds up to 128 entries
First usable sector is 34, last usable sector is 34359738334
Partitions will be aligned on 256-sector boundaries
Total free space is 3951296734 sectors (1.8 TiB)

Number  Start (sector)    End (sector)  Size       Code  Name
   1            2048         4982527   2.4 GiB     FD00
   2         4982528         9176831   2.0 GiB     FD00
   3         9437184     30408703966   14.2 TiB    FD00  Linux RAID
[root@ora12c ~]# mdadm --detail /dev/md127
/dev/md127:
        Version : 1.2
  Creation Time : Tue Jan 12 00:23:11 2016
     Raid Level : raid1
     Array Size : 15199632367 (14495.50 GiB 15564.42 GB)
  Used Dev Size : 15199632367 (14495.50 GiB 15564.42 GB)
   Raid Devices : 1
  Total Devices : 1
    Persistence : Superblock is persistent

    Update Time : Fri Dec 29 22:15:58 2017
          State : clean
 Active Devices : 1
Working Devices : 1
 Failed Devices : 0
  Spare Devices : 0

           Name : Gen8:2
           UUID : e3b94737:7549dd5b:afe0a119:b9080857
         Events : 54

    Number   Major   Minor   RaidDevice State
       0       8       83        0      active sync   /dev/sdf3
[root@ora12c ~]# mdadm -S /dev/md127
mdadm: stopped /dev/md127
[root@ora12c ~]# gdisk /dev/sdf
GPT fdisk (gdisk) version 0.8.6

Partition table scan:
  MBR: protective
  BSD: not present
  APM: not present
  GPT: present

Found valid GPT with protective MBR; using GPT.

Command (? for help): p
Disk /dev/sdf: 34359738368 sectors, 16.0 TiB
Logical sector size: 512 bytes
Disk identifier (GUID): 3FA697A2-5A88-45AD-89B3-70C227AF71AE
Partition table holds up to 128 entries
First usable sector is 34, last usable sector is 34359738334
Partitions will be aligned on 256-sector boundaries
Total free space is 3951296734 sectors (1.8 TiB)

Number  Start (sector)    End (sector)  Size       Code  Name
   1            2048         4982527   2.4 GiB     FD00
   2         4982528         9176831   2.0 GiB     FD00
   3         9437184     30408703966   14.2 TiB    FD00  Linux RAID

Command (? for help): d
Partition number (1-3): 3

Command (? for help): n
Partition number (3-128, default 3): 3
First sector (34-34359738334, default = 9176832) or {+-}size{KMGTP}: 9437184
Last sector (9437184-34359738334, default = 34359738334) or {+-}size{KMGTP}:
Current type is 'Linux filesystem'
Hex code or GUID (L to show codes, Enter = 8300): FD00
Changed type of partition to 'Linux RAID'

Command (? for help): p
Disk /dev/sdf: 34359738368 sectors, 16.0 TiB
Logical sector size: 512 bytes
Disk identifier (GUID): 3FA697A2-5A88-45AD-89B3-70C227AF71AE
Partition table holds up to 128 entries
First usable sector is 34, last usable sector is 34359738334
Partitions will be aligned on 256-sector boundaries
Total free space is 262366 sectors (128.1 MiB)

Number  Start (sector)    End (sector)  Size       Code  Name
   1            2048         4982527   2.4 GiB     FD00
   2         4982528         9176831   2.0 GiB     FD00
   3         9437184     34359738334   16.0 TiB    FD00  Linux RAID

Command (? for help): w

Final checks complete. About to write GPT data. THIS WILL OVERWRITE EXISTING
PARTITIONS!!

Do you want to proceed? (Y/N): y
OK; writing new GUID partition table (GPT) to /dev/sdf.
Warning: The kernel is still using the old partition table.
The new table will be used at the next reboot.
The operation has completed successfully.
The most important thing is the start sector of the partition and it MUST be the same.
[root@ora12c ~]# blockdev --rereadpt /dev/sdf
blockdev: ioctl error on BLKRRPART: Device or resource busy
[root@ora12c ~]# mdadm -R /dev/md127
[root@ora12c ~]# mdadm -S /dev/md127
mdadm: stopped /dev/md127
[root@ora12c ~]# blockdev --rereadpt /dev/sdf
[root@ora12c ~]# mdadm -R /dev/md127
[root@ora12c ~]# mdadm --grow /dev/md127 --size=max
mdadm: component size of /dev/md127 has been set to 17175149551K
unfreeze
[root@ora12c ~]# mdadm --detail /dev/md127
/dev/md127:
        Version : 1.2
  Creation Time : Tue Jan 12 00:23:11 2016
     Raid Level : raid1
     Array Size : 17175149551 (16379.50 GiB 17587.35 GB)
  Used Dev Size : 17175149551 (16379.50 GiB 17587.35 GB)
   Raid Devices : 1
  Total Devices : 1
    Persistence : Superblock is persistent

    Update Time : Fri Dec 29 22:41:22 2017
          State : clean
 Active Devices : 1
Working Devices : 1
 Failed Devices : 0
  Spare Devices : 0

           Name : Gen8:2
           UUID : e3b94737:7549dd5b:afe0a119:b9080857
         Events : 58

    Number   Major   Minor   RaidDevice State
       0       8       83        0      active sync   /dev/sdf3
[root@ora12c ~]# e2fsck -f /dev/md127
e2fsck 1.42.9 (28-Dec-2013)
Pass 1: Checking inodes, blocks, and sizes
Inode 470941892 has INDEX_FL flag set on filesystem without htree support.
Clear HTree index<y>? yes
Inode 557581448 has INDEX_FL flag set on filesystem without htree support.
Clear HTree index<y>? yes
Inode 557582191 has INDEX_FL flag set on filesystem without htree support.
Clear HTree index<y>? yes
Inode 557582540 has INDEX_FL flag set on filesystem without htree support.
Clear HTree index<y>? yes
Inode 557583296 has INDEX_FL flag set on filesystem without htree support.
Clear HTree index<y>? yes
Pass 2: Checking directory structure
Pass 3: Checking directory connectivity
Pass 4: Checking reference counts
Pass 5: Checking group summary information

1.42.6-5644: ***** FILE SYSTEM WAS MODIFIED *****
1.42.6-5644: 14818/949977088 files (3.6% non-contiguous), 3501742017/3799908091 blocks
[root@ora12c ~]# resize2fs /dev/md127
resize2fs 1.42.9 (28-Dec-2013)
Resizing the filesystem on /dev/md127 to 4293787387 (4k) blocks.
The filesystem on /dev/md127 is now 4293787387 blocks long.

[root@ora12c ~]# ls /mnt
dsm  iso  test
[root@ora12c ~]# mount /dev/md127 /mnt/dsm
[root@ora12c ~]# df -h /mnt/dsm
Filesystem      Size  Used Avail Use% Mounted on
/dev/md127       16T   13T  3.0T  82% /mnt/dsm
[root@ora12c ~]# umount /dev/md127
You might not get any error when run the the e2fsck command.


Done!
Now you could enjoy the large space in the NAS system.